Presentation
OMniLeads makes campaigns with automatic call dialing available through a predictive dialer.
Important
The automatic dialer functionality is not provided within the GPLV3 base components, to use this type of campaigns the integration with Wombat Dialer. is contemplated. The use of this software is subject to the acquisition of the corresponding license with the software manufacturer.
Having clarified the theme of the engine dialer component, we proceed with the explanation of the necessary steps when generating a campaign with predictive dialing.
Dialer campaign creation
Enter the Campaigns menu -> Dialer Campaigns -> New Campaigns where a sequence of configuration stages are displayed.
The first stage looks like figure 1.
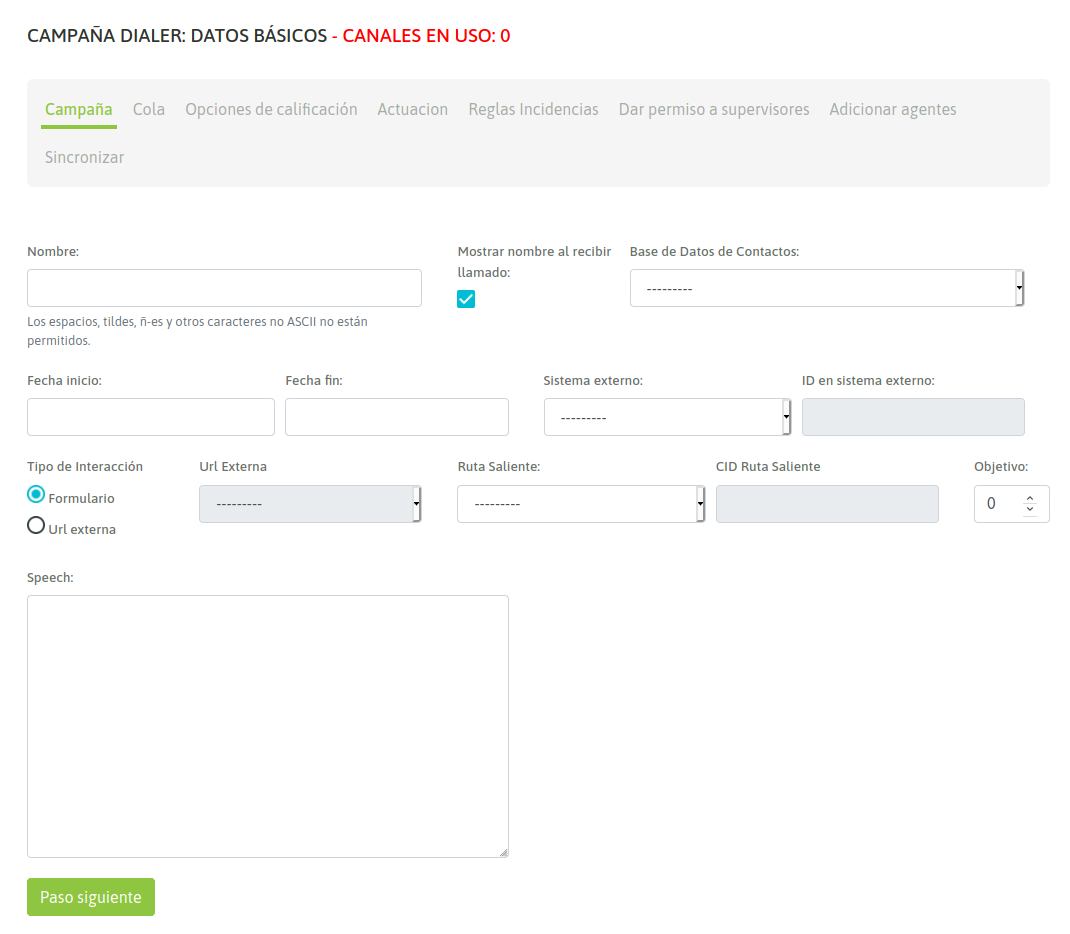
Figure 1: Campaign Parameters
- Name: Campaign Name
- Show campaign name whe reciving call: it can be enabled so that each call connected by the dialer to the agent implies notification of the name of the campaign associated with that call.
- Contact database: the contact database that the dialer uses to make contacts and generate calls.
- Initial date: date on which, while the campaign is active and with agents connected, it will start dialing.
- End date: date on which the dial will stop dialing no matter how many numbers remain unmarked.
- External system: external CRM system linked to launch click to call actions or dispositions on campaign contacts, through the API.
- ID on external system: ID of the campaign in the external system from where the click to call or disposition requests will be sent.
- Interaction class: select if the campaign will use a campaign form or will launch an http-request to an external CRM system.
- External URL: URL (http-request) to be triggered each time the dialer connects a call to an agent.
- Outbound Routes: An existing outbound route is assigned to an campaign.
- CID on Outbound Routes: This field must contain the CID assigned for an existing outbound route to a campaign.
- Scope: it is defined as the amount of engaged dispositions expected for the campaign. In the campaign monitoring, the percentage of the campaign’s arrival with respect to the defined objective is shown in real time.
- Speech: Campaign speech to be displayed on the agent console on campaign calls.
Once these fields are completed, you must click on the Next button, to continue with the campaign configuration.
The next stage establishes more parameters that model the campaign behavior, as shown in Figure 2.
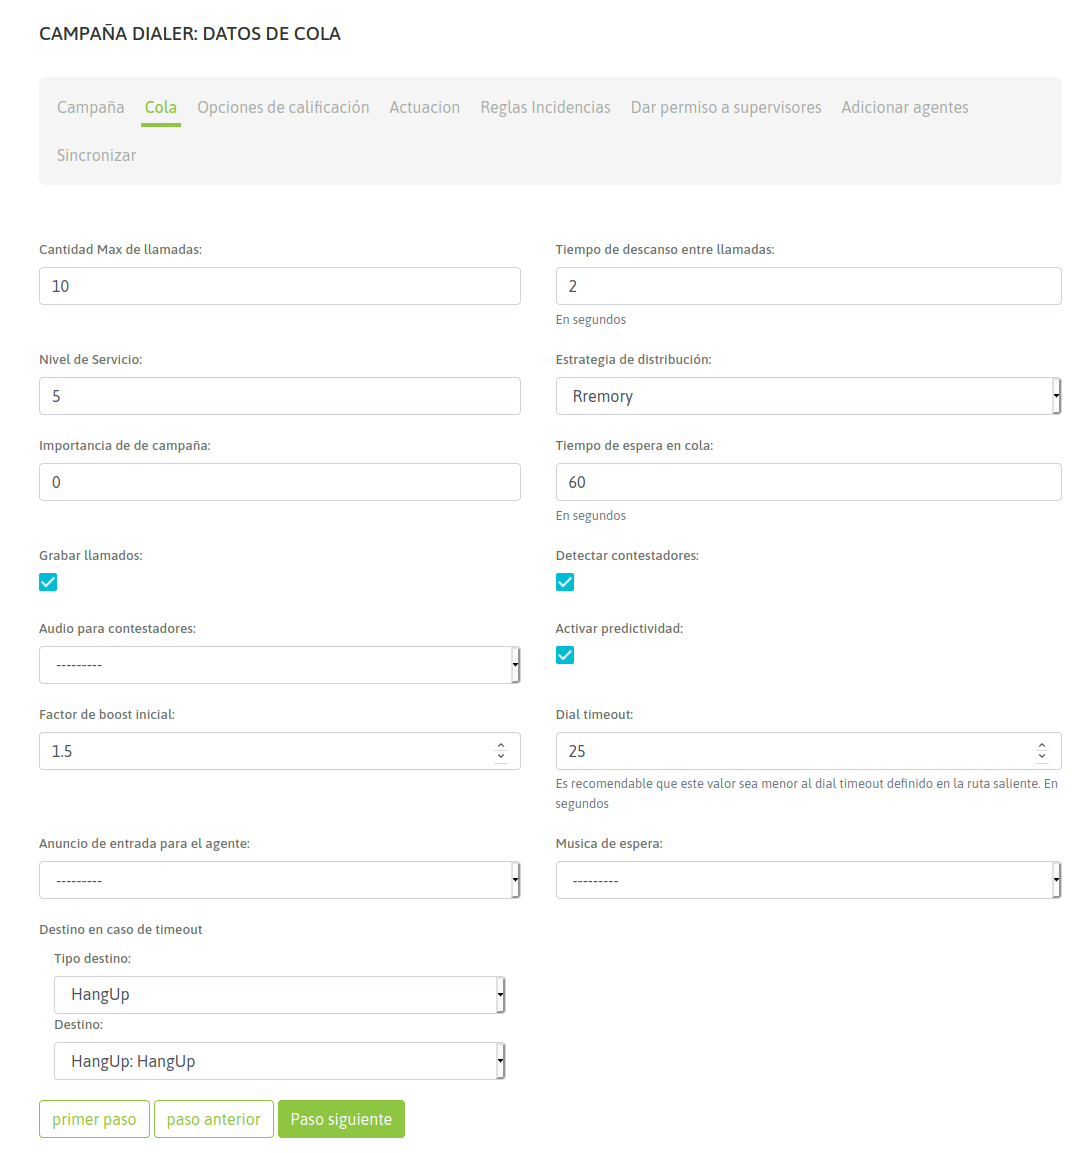
** Figure 2: Campaign Parameters
- Max amount of calls: number of calls that are allowed to be queued while waiting for the availability of an agent. Above that number, the call will be sent to the failover destination.
- Wrapup time: It is the rest time (in seconds) that each agent has between each call connected by the dialer.
- Service level: It is a parameter to measure how many of the calls were connected to an agent within that time slot (in seconds).
- Distribution strategy: call distribution method that the campaign on agents will use. For outbound campaigns, RRmemory is recommended.
- Campaign priority: it is a linear parameter (1 to 10), which implies how important are the calls of this campaign with respect to others. Set priorities for agents working in several campaigns simultaneously. If the value is left at 0 (by default), equity is maintained with the rest of the campaigns.
- Waiting time: It is the time (in seconds), that the call contacted will be queued, waiting for an agent to be released to connect it.
- Enable recordings: Enable all campaign calls to be recorded.
- Answer Machine Detection: enable answering machine detection.
- AMD audio play: You can indicate the playback of an audio if an answering machine is detected. For audio to be available, it must be pre-loaded from the Audios menu> New audio
- Predictive mode activation: The dialer offers a configuration that makes it possible to review statistics on the effectiveness of the campaign during its performance. Depending on these results, the number of calls generated by available agent will be varied in such a way as to avoid dead times between each calls assigned by the dialer to each agent.
- Initial Boost Factor: Indicates the value by which you want to multiply the predictive behavior. For example: if the dialer detected that it can make three calls simultaneously because it is the result of the successful communications statistics, by placing 2 in the initial boost factor, the dialer is asked to double that value and then make six calls at once.
- Dial timeout: It is the time (in seconds) to ring before sending a CANCEL.
- Agent Announcement: An audio can be selected for playing at the moment a campaign call comes to an agent. For the audio to be available, it should be previously uploaded from the menu Telephony -> Audios -> Custom Audios, button “Add”.
- Music on hold: You can select a special music on hold for the campaign, which will be played until there is an agent available to answer the call, or until the waiting time in queue is reached so the call is directed to the destination in case of timeout. For music on hold to be available, it should be previously added in the menu Telephony -> Audios -> Waiting Music lists ,”Add” button.
- Failover dst: destination to where calls that have expired (timeout) go.
After completing all the fields, click next
On the this stage you must assign the dispositions that are required as available to the agents when classifying each call to each contact.
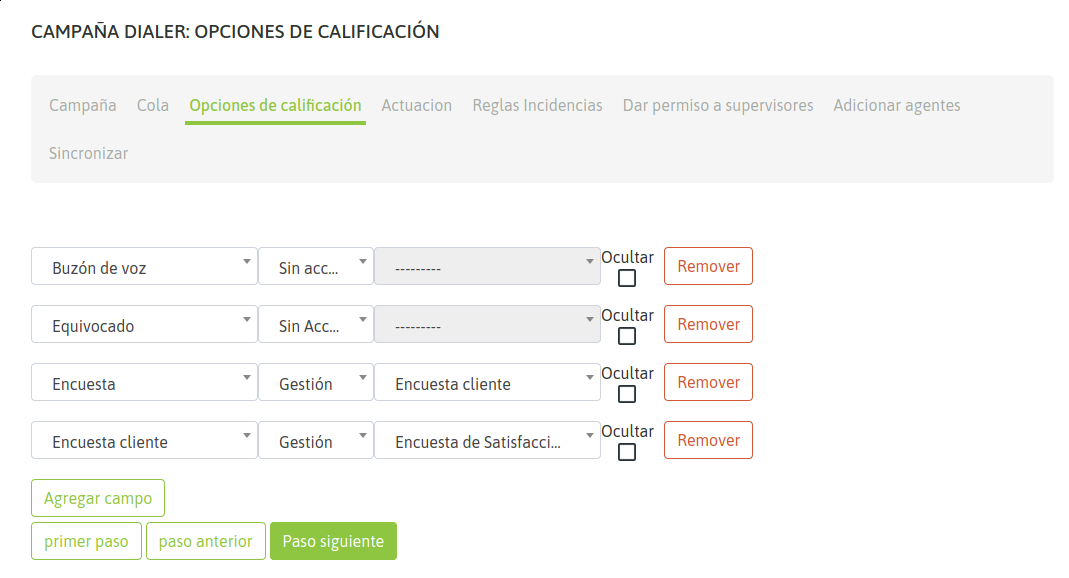
Figure 3: Campaign Parameters - Call Dispositions
We arrive at the configuration that determines what days of the week and the time of day which this campaign can place calls (always within the range of dates established in the first step of creating the campaign).
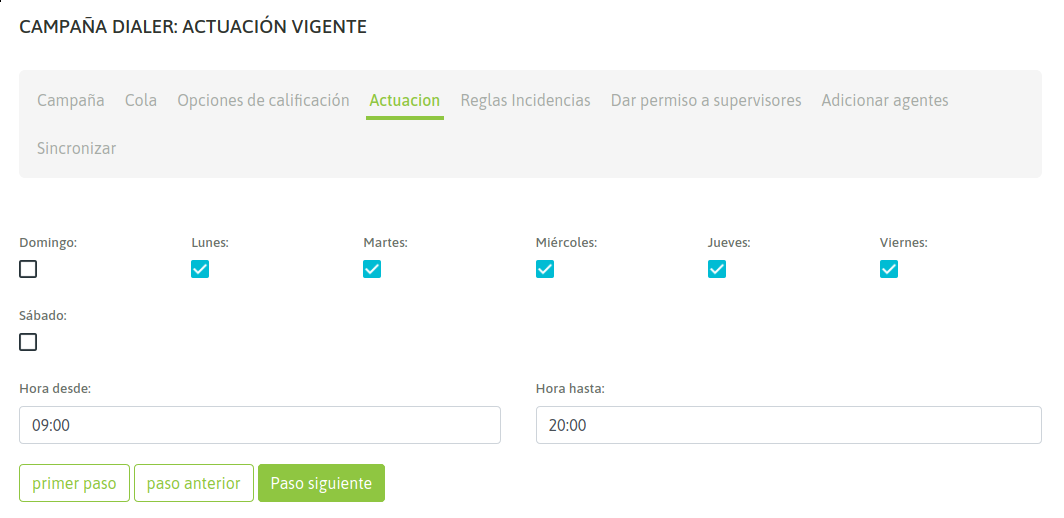
Figure 4: Campaign Parameters - Days and Hours
Now the reschedule rules are configured, that is how the dialer tries to call numbers whose contact attempt was failed: Busy, Answering Machine, No Answer, temporarily out of coverage, etc.

Figure 5: Campaigns Parameters - Incidence Rules
The fields completed allow you to determine how many times it should retry to establish communication and how many seconds after an failed try, the dialer should retry to call.
Callstatus that can be retried automatically dial are:
- Busy
- Answer machine
- Phone not answer
- Call rejected (Rejected): when the call could not be carried out due to problems inherent to the external telephone network.
- Timeout: when the call was contacted, it was connected but no agent was free to handle it.
Finally we go to the last stage

Figure 6: Campaign Parameters - Supervisors
Finally we go to the last stage
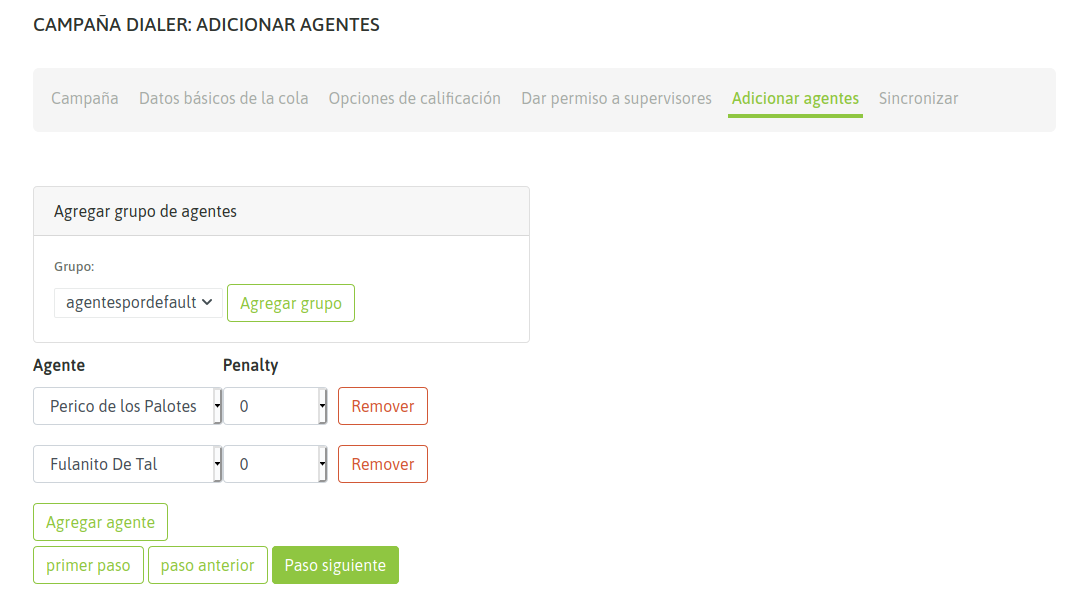
Figure 7: Campaign Parameters - Agents
Finally we go to the last stage
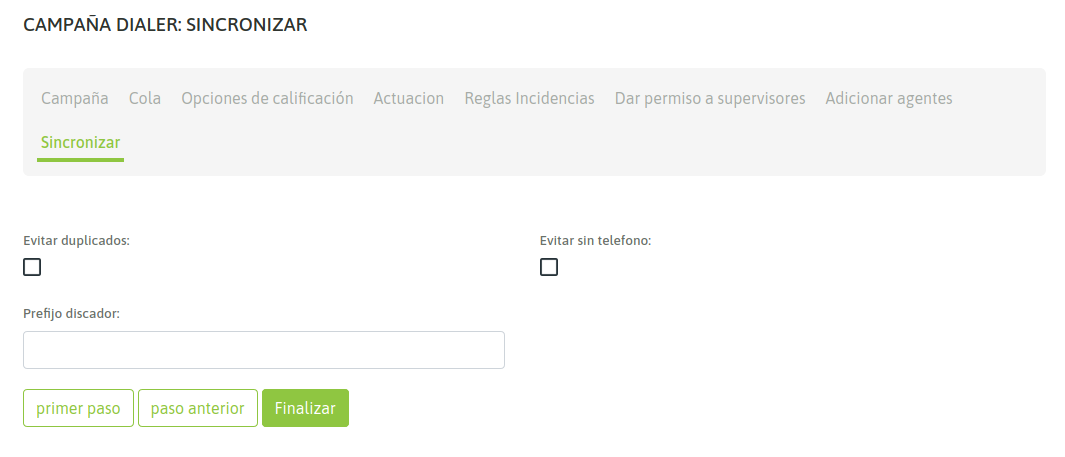
Figure 8: Campaign Parameters - Sync
In this step, three options are simply indicated:
- Avoid Duplicated: Select this option to avoid uploading records with the duplicate main phone to the dialer.
- Avoid Without Numbers: select this option to avoid uploading contact base records that do not have a primary telephone to the dialer.
- Prefix: This field is used to indicate to the dialer the prefix that must be placed before each number of the contact base at the time of dialing the campaign calls.
Finally we go to the last stage
Campaign Activation
The newly created campaign appears in the incative state (figure 7), in the list of predictive campaigns.
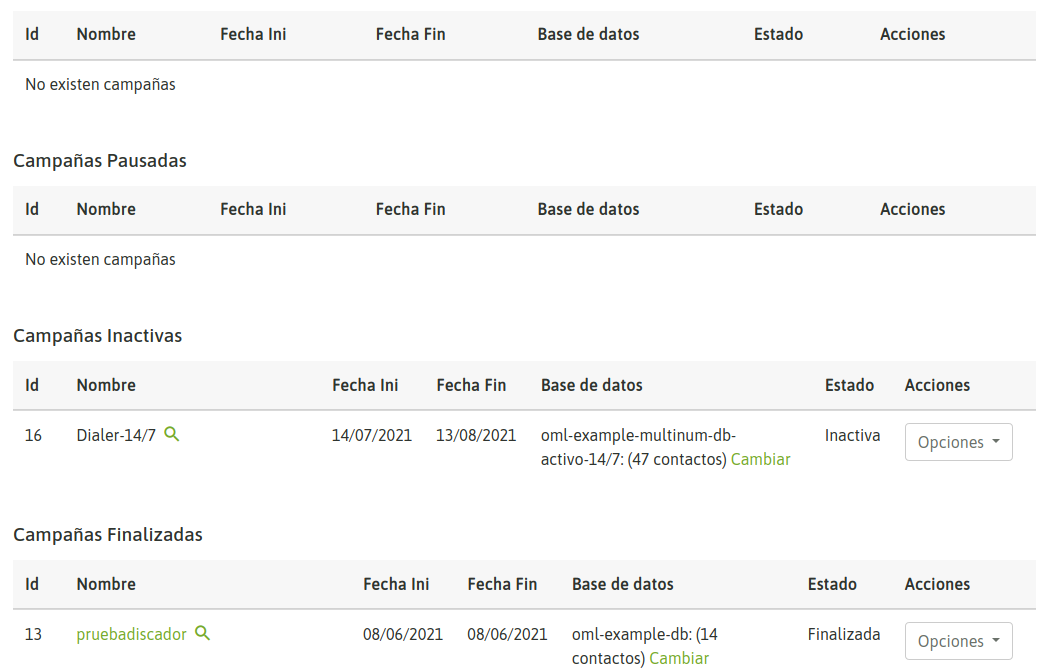
Figure 9: Inactive Campaign
The administrator should activate the campaign manually.
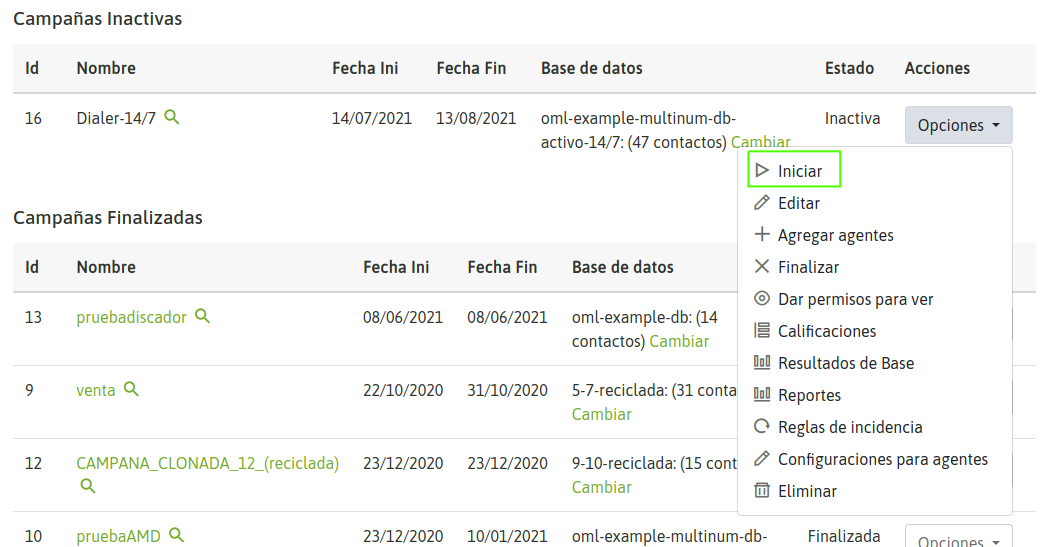
Figure 10: Activate Campaign
After activating the campaign, it should appear in active campaign list (figure 9)
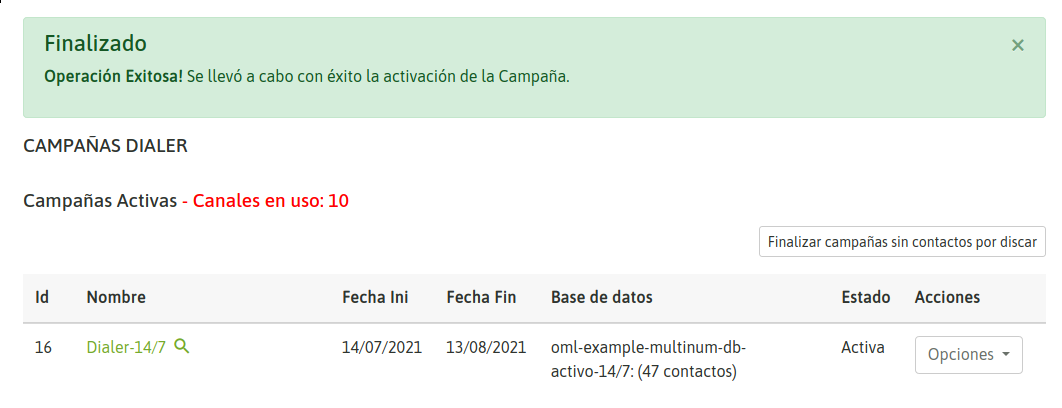
Figure 11: Active Campaigns
As soon as an agent assigned to our predictive campaign login within the active date and time range of the campaign, then the dialer can start generating calls and deliver these to the agents active in the campaign.
Predictive dialer campaigns completion
To determine when a predictive campaign is without records to be dial, the status of the campaign must be checked by clicking on the name of the campaign (figure 10).
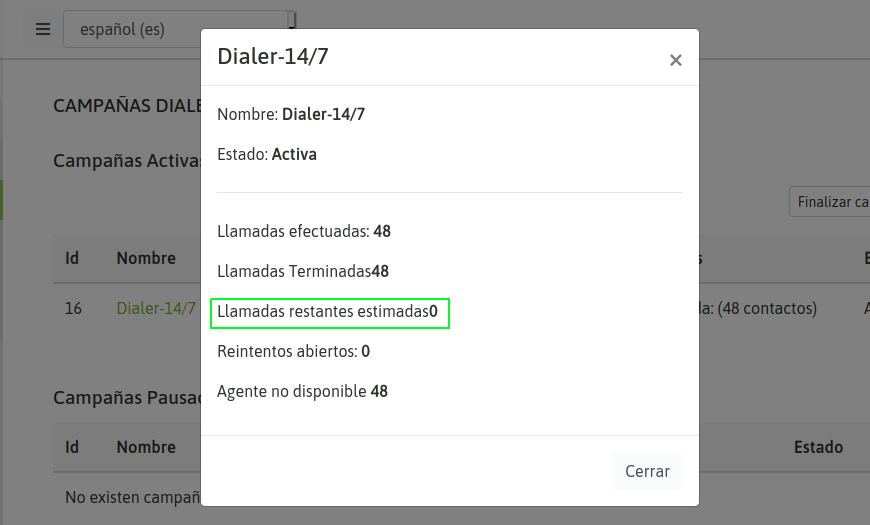
Figure 12: Campaign Pending Calls
When the value “Pending calls” is at 0, you should press the button “End campaigns without contacts by dialing” to end all campaigns without contacts to dial, as shown in next figure:
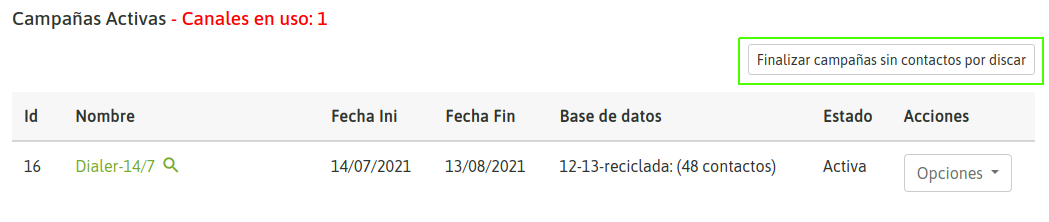
Figure 13: End campaigns without contacts to dial
Or it can be finalized individually:
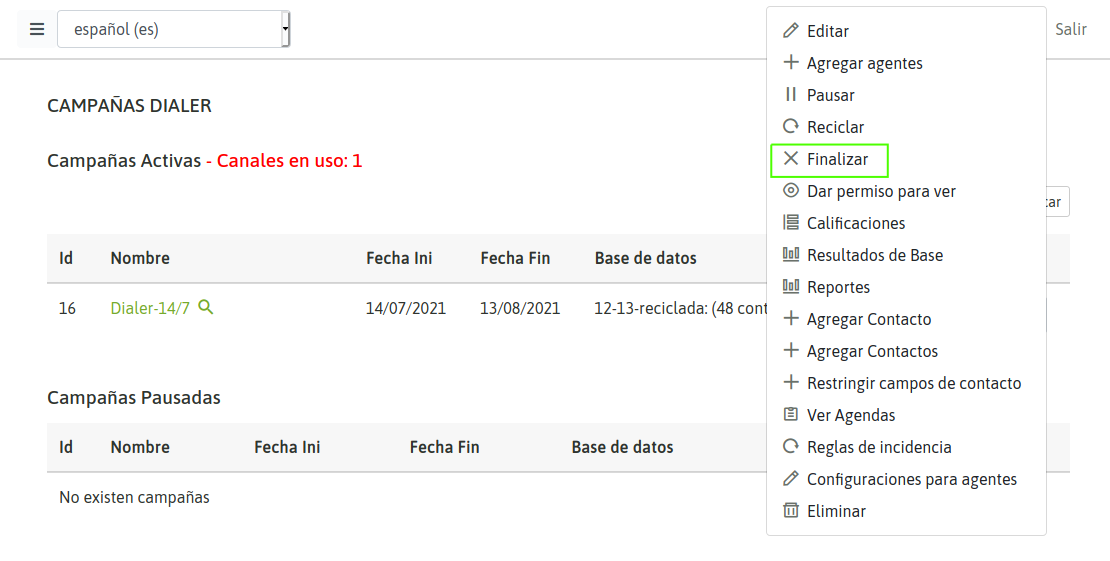
Figure 14: Finalize a Campaign
The campaign goes to the list of * Campaigns finished*.
Recycling and rotation of contact databases
When a predictive campaign runs out of pending records to call its contact base, that campaign can be reused through two possibilities:
Recycle the contact base
This option allows the administrator to select contacts from the base with certain dispositions made by agents (on connected calls) as well as dispositions made by the dialer (on failed calls; busy, does not answer, voicemail, etc.), as a recycling criterion from the contact base of the current campaign, so that the dialer returns to call the contacts that fall within the dispositions indicated in the recycling.
To recycle a completed campaign, we should display the menu “Options” of the campaign, and select “Recycle”, as it is shown in the following figure:
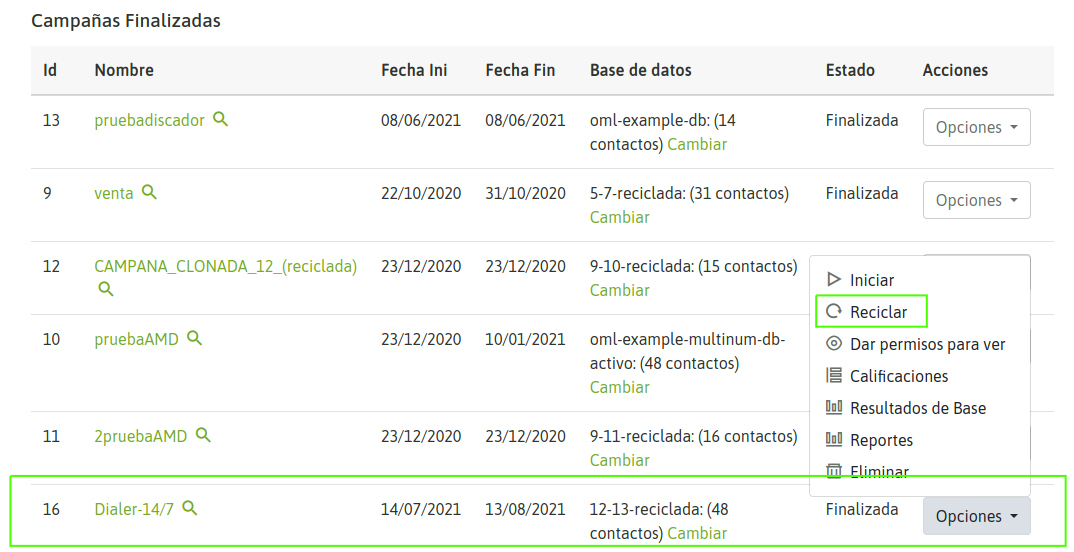
Figure 15: Campaign Recycle
The different call dispositions will be shown and we can choose between 2 recycling modes:
- Redial the selected contacts from the same campaign.
- In other words, redial the selected contacts, but on a new campaign similar to the original one and whose contact base will be the result of recycling.
To complete the procedure you must select the dispositions to be called again and then go through the stages of predictive campaign configuration in case you need to adjust any configuration parameter of the recycled campaign.
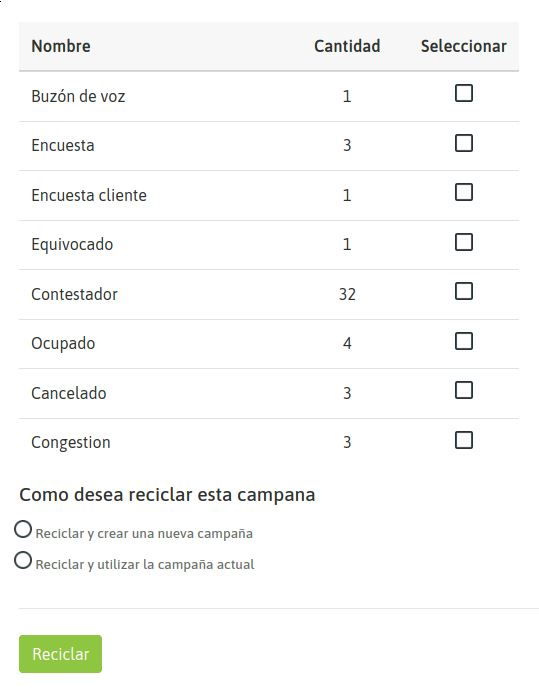
Figure 16: Recycle, Call Dispositions
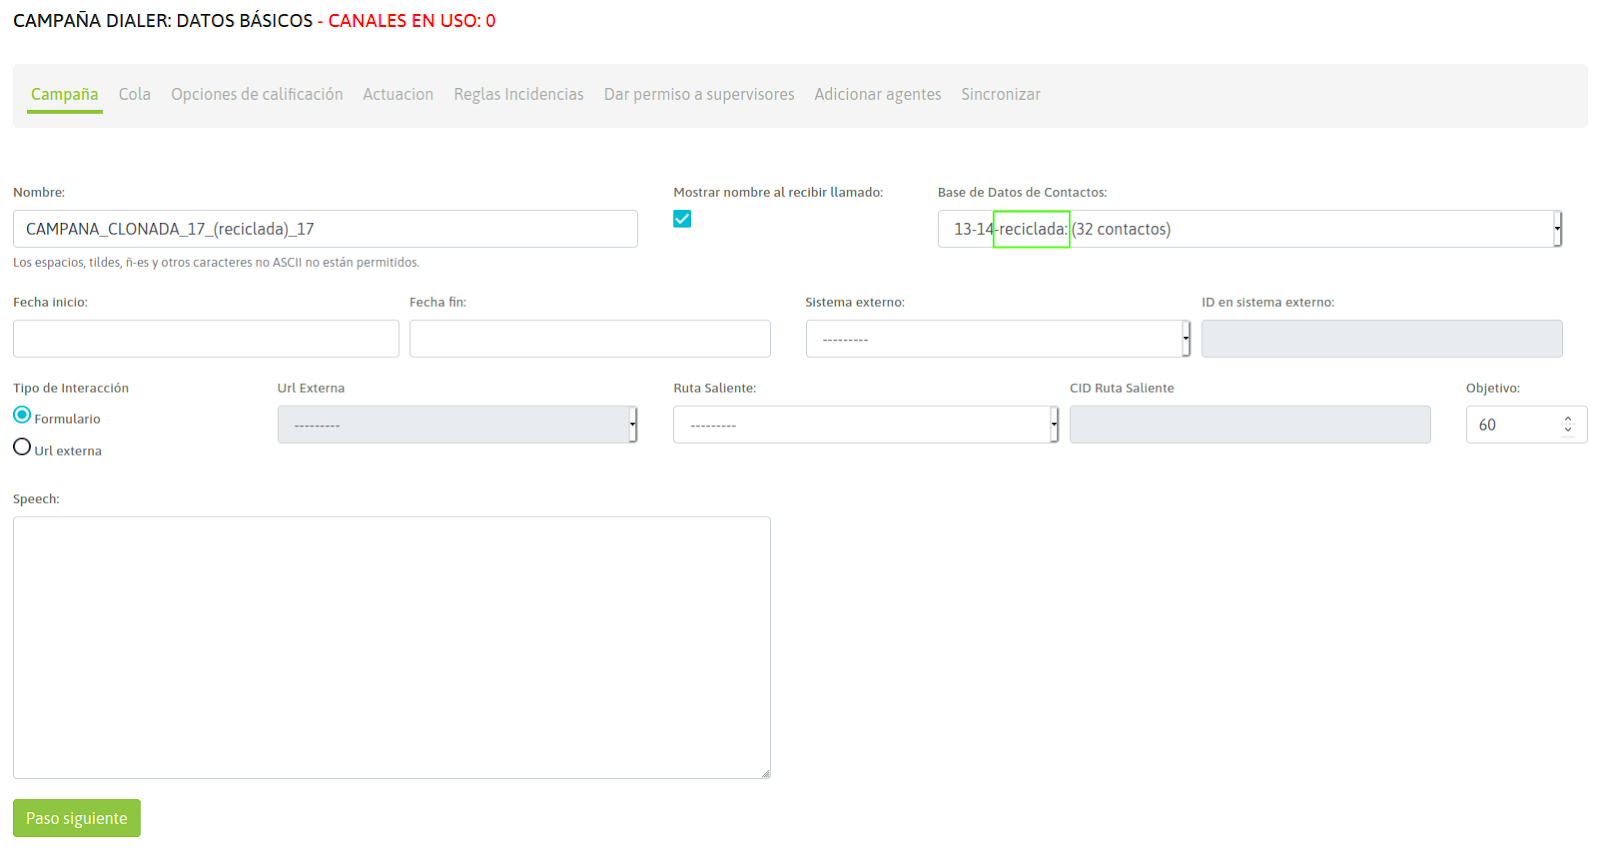
Figure 17: Parametrization of Recycled Campaign
When executing the recycling, the campaign is in the Inactive state, therefore it remains to activate the campaign so that the recycled contacts begin to be marked by the dialer.
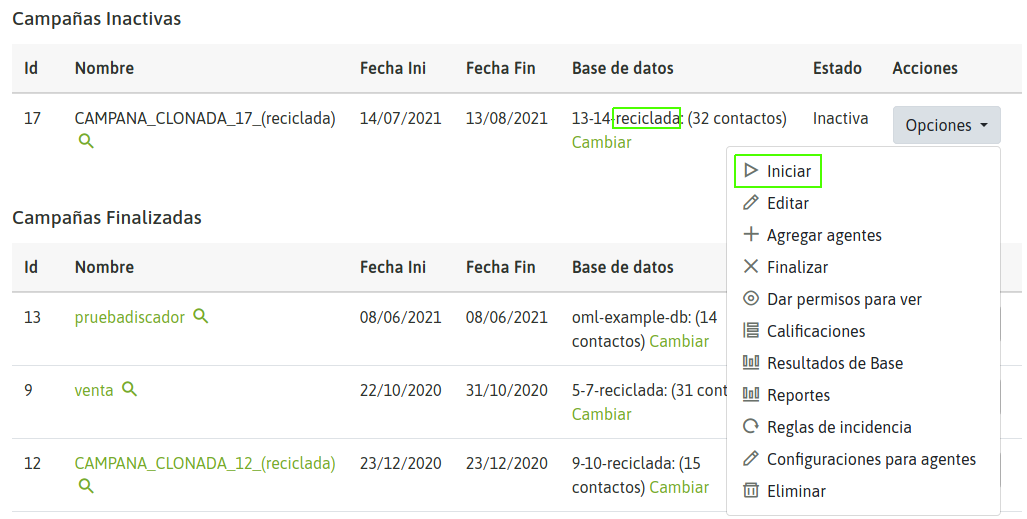
Campaign activation
Contact database rotation
A campaign can replace its contact database with a new one. This allows to continue operating with the same campaign but to renew the source of contacts to call. In this way the history of reports, recordings and other statistics in the same campaign is followed.
To carry out a contact database change, the campaign must be paused or under the status of finished. Then you must click on the database change campaign option.
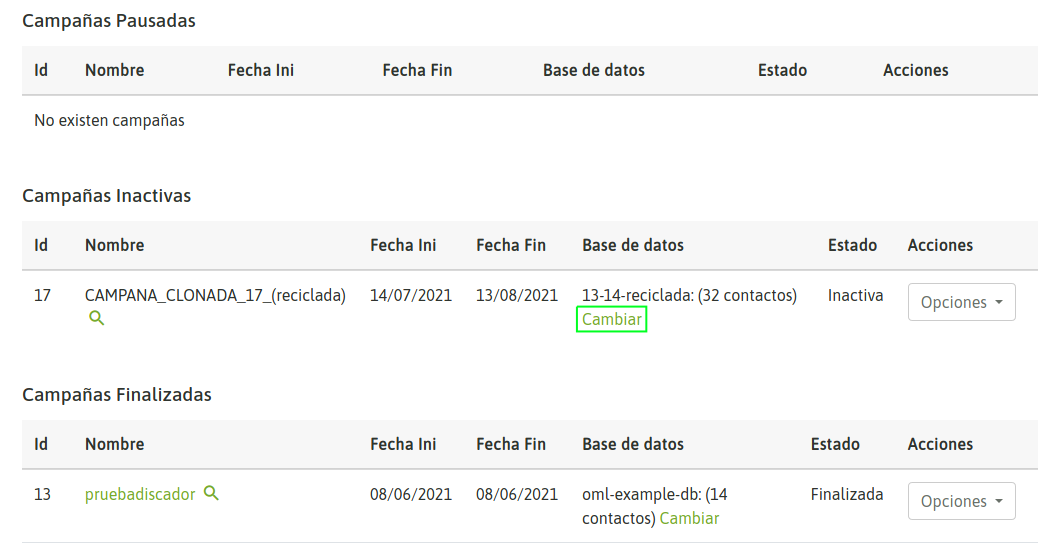
Figure 19: Contact Database Change
This will display a screen similar to the one shown in the following figure 17.
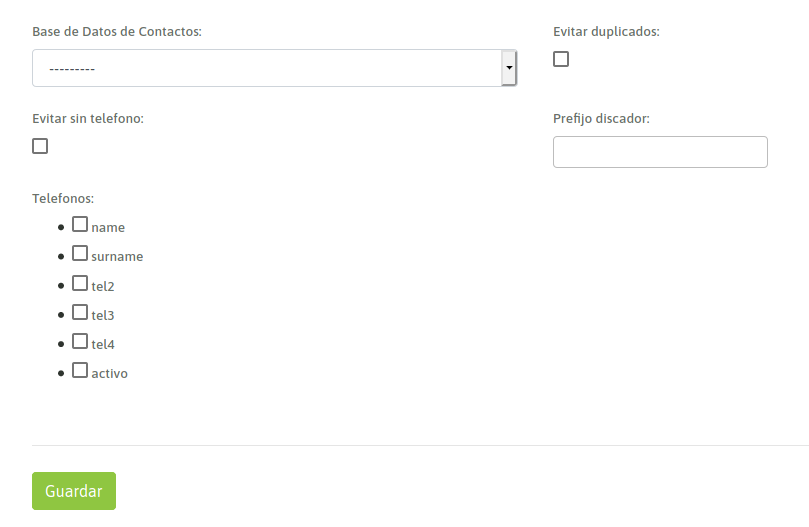
Figure 20: Contact Database Change Form
Important
The contact database structure that can be used as a substitute should be similar to the contact database to be replaced.
Once the database rotation is carried out it is necessary to activate the campaign again.