IT administrator managment
Environment variables
Through this section is going to be commented the procedures that needs the use of inventory file. As known the file is edited bofer installation and after that it becomes default. But the variables and their values stayes as environment variables.
To check this variables open the file /etc/profile.d/omnileads_envars.sh.
cat /etc/profile.d/omnileads_envars.sh

AMI_USER=omnileadsami
AMI_PASSWORD=5_MeO_DMT
ASTERISK_IP=192.168.95.163
ASTERISK_HOSTNAME=localhost.localdomain
ASTERISK_LOCATION=/opt/omnileads/asterisk
CALIFICACION_REAGENDA=Agenda
DJANGO_PASS=098098ZZZ
DJANGO_SETTINGS_MODULE=ominicontacto.settings.production
EPHEMERAL_USER_TTL=28800
EXTERNAL_PORT=443
INSTALL_PREFIX=/opt/omnileads/
KAMAILIO_IP=192.168.95.163
KAMAILIO_HOSTNAME=localhost.localdomain
KAMAILIO_LOCATION=/opt/omnileads/kamailio
MONITORFORMAT=mp3
NGINX_HOSTNAME=localhost.localdomain
OMNILEADS_HOSTNAME=localhost.localdomain
PGHOST=localhost.localdomain
PGDATABASE=omnileads
PGUSER=omnileads
PGPASSWORD=my_very_strong_pass
PYTHONPATH=$INSTALL_PREFIX
REDIS_HOSTNAME=localhost
SESSION_COOKIE_AGE=3600
TZ=America/Argentina/Cordoba
WOMBAT_HOSTNAME=localhost.localdomain
WOMBAT_USER=demoadmin
WOMBAT_PASSWORD=demo

export AMI_USER AMI_PASSWORD ASTERISK_IP ASTERISK_HOSTNAME ASTERISK_LOCATION CALIFICACION_REAGENDA DJANGO_SETTINGS_MODULE DJANGO_PASS EPHEMERAL_USER_TTL EXTERNAL_PORT INSTALL_PREFIX KAMAILIO_IP KAMAILIO_HOSTNAME KAMAILIO_LOCATION MONITORFORMAT NGINX_HOSTNAME OMNILEADS_HOSTNAME PGHOST PGDATABASE PGUSER PGPASSWORD PYTHONPATH REDIS_HOSTNAME SESSION_COOKIE_AGE TZ WOMBAT_HOSTNAME WOMBAT_USER WOMBAT_PASSWORD
This way the administrator can see them when he/she wants
Important
Do not edit this file.
Configuration of the Predictive Dialer module
Note
First of all, we notify that if the OML instance deployed in the previous steps does not contemplate the use of campaigns with predictive outbound dialer, this step can be omitted.
OMniLeads needs a third-party tool to implement the campaigns with predictive outbound dialer. This tool is based on comercial software licenses that must be managed with the manufacturer.
In any case the system can be used with a test channel that grants as a demo. Therefore we can configure the component and run concept tests before acquiring licenses for a real operation.
If running predictive campaigns is desired, we must generate the following basic Wobal Dialer settings. To generate this configuration we must follow some steps that begin with the access to the corresponding URL.
http://omnileads.yourdomain:8080/wombat or http://XXX.XXX.XXX.OML:8080/wombat
Note
In case of running OMniLeads Dockerized the URL is:http://XXX.XXX.XXX.OML:442/wombat
Where XXX.XXX.XXX.OML is the IP of docker engine host
Creation of database
When enter for the first time, we must proceed with the creation of a MariaDB database that uses Wombat Dialer. Click on the highlighted button in figure 2.
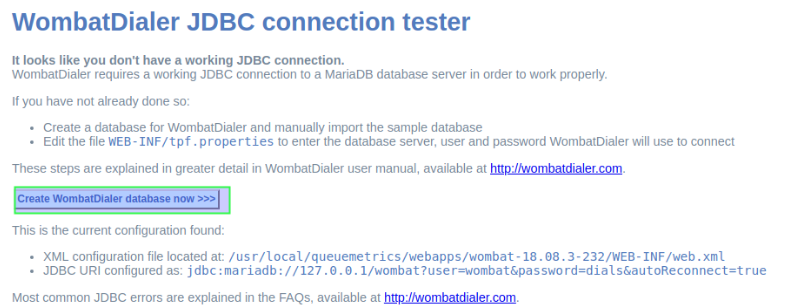
Figure 1: DB create
Then is the moment to ingress root MySQL user password and then click on the button shown in figure 2.
Note
Since OMniLeads 1.6.0 version a MySQL root password is not set, so you can leave this field empty.
We proceed then with the creation of the MariaDB database that will use from now on the Wombat Dialer component.
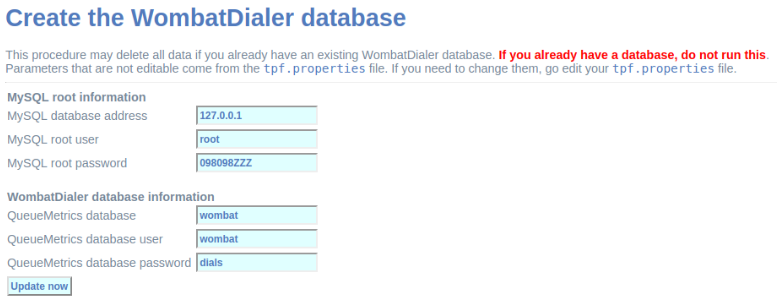
Figure 2: MariaDB root password
First login
Once created the MariaDB database that Wombat Dialer uses, we proceed with the first login.
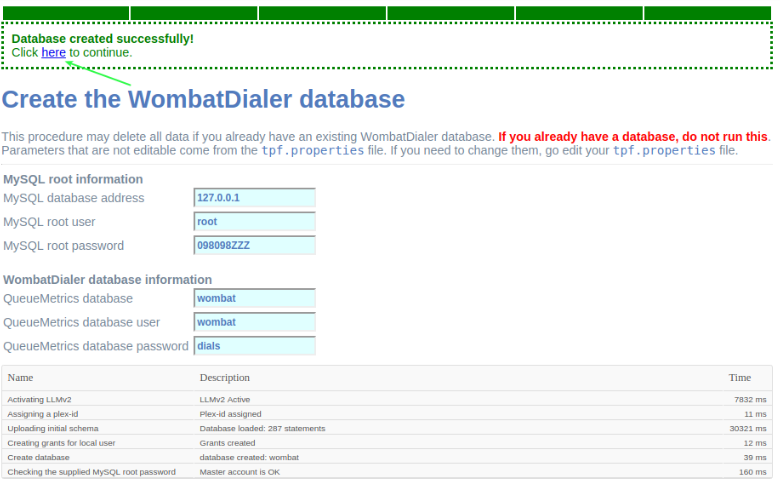
Figure 3: Login post db create
A login must be performed then in the Wombat Dialer administration interface to continue with the configuration of the necessary parameters for the OML interaction.
Upon entering a screen like the following is displayed, where we must access with the user and passwords generated within the installation.
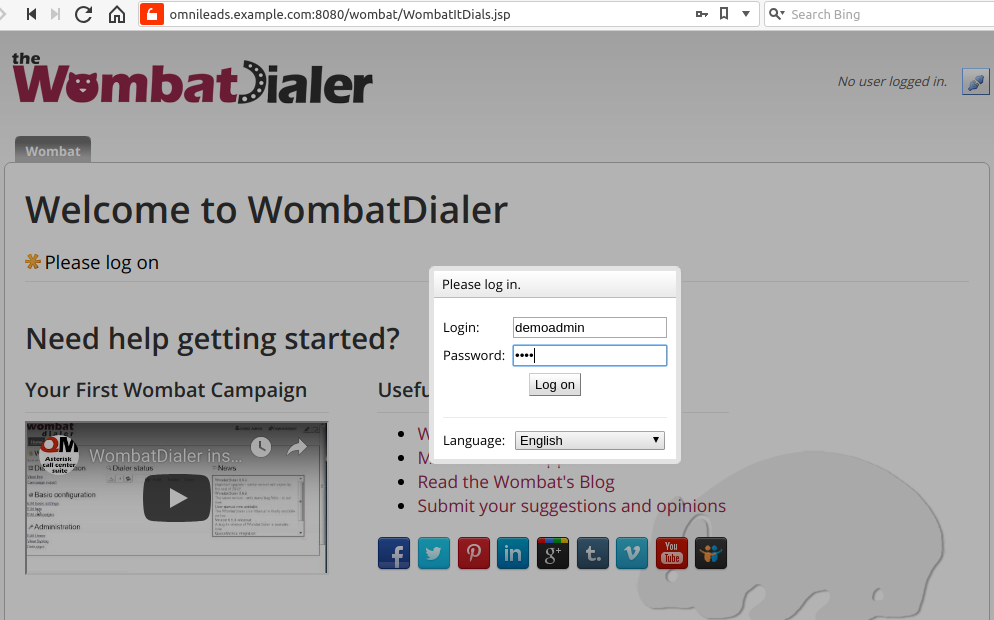
Figure 4: Access to WD
Change of web credentials
By default Wombat Dialer comes with the web credentials demoadmin as user and demo as password. These credentials can be changed:
- Firstly, the credentials must be defined in the inventory file, these are the variables dialer_user and dialer_password. See Passwords and parameters.
- Go to Wombat Dialer web, and go to Administration -> Edit users.
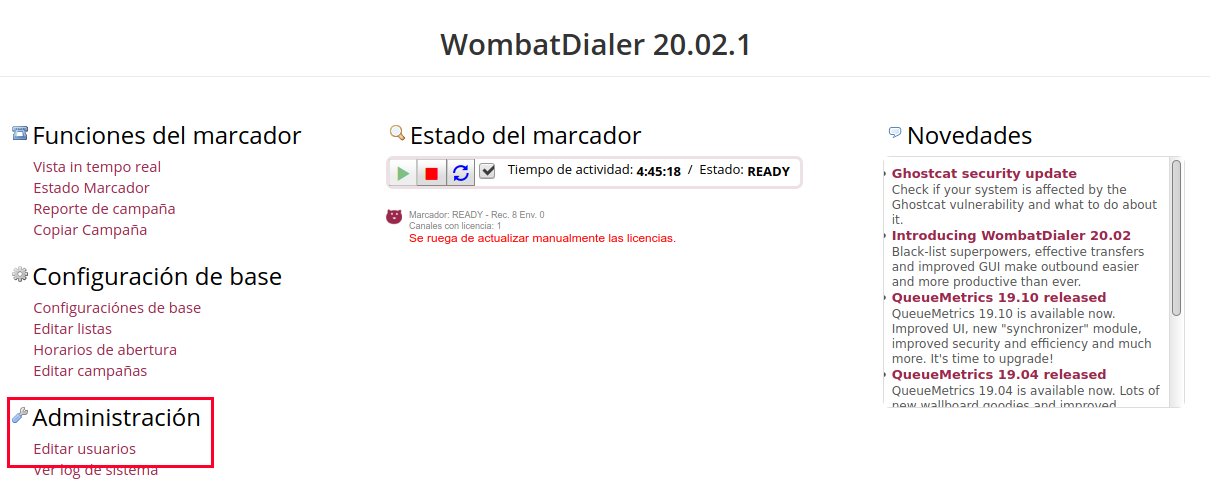
Figure 5: WD change credentials
- There you can see the user demoadmin, click on the pencil icon, change the user in Login field with the same user you ingressed in the variables dialer user, for password use the same password ingressed in dialer_password.
- Finally click on Save button.
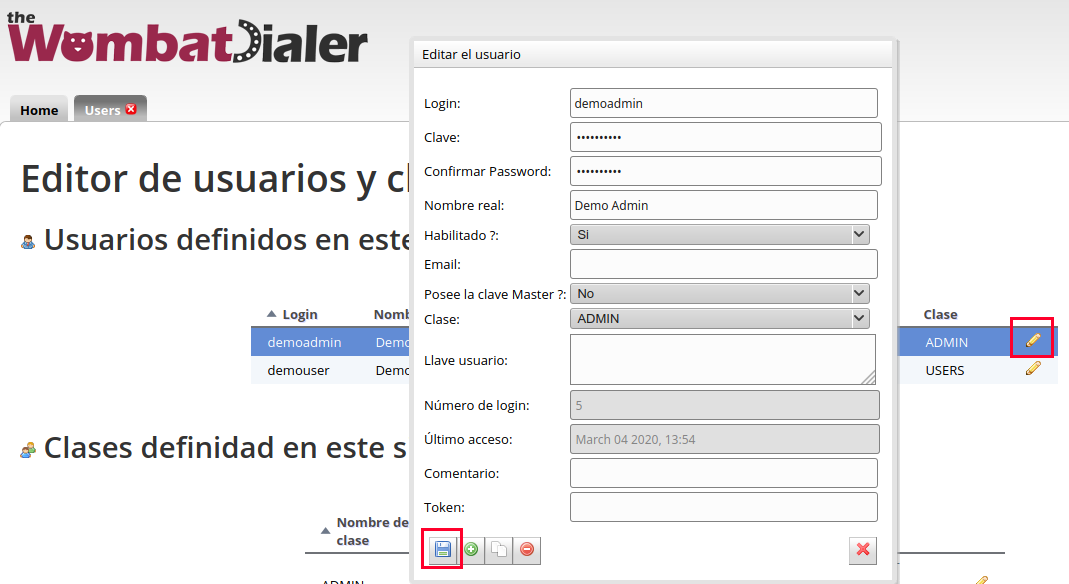
Figure 6: WD change credentials 2
- Once finished, reload the page and ingress with the new credentials.
AMI credentials
Note
From release-1.8.0 take care of this
Wombat Dialer will use different AMI credentials that OMniLeads uses, for that reason, the AMI user wombatami is created inside the file oml_manager.conf. The password for this AMI user changes depending of what inserted the user in inventory file parameter ami_password. By default the user comes this way:
[wombatami]
secret =  5_MeO_DMT
deny = 0.0.0.0/0.0.0.0
permit = 127.0.0.1/255.255.255.255
read = all
write = all
Basic parameters
Once inside the system, we proceed with the configuration of the two basic parameters to make the integration with OMniLeads ready. To do this we must access the “Basic configuration” menu as indicated in figure 7.
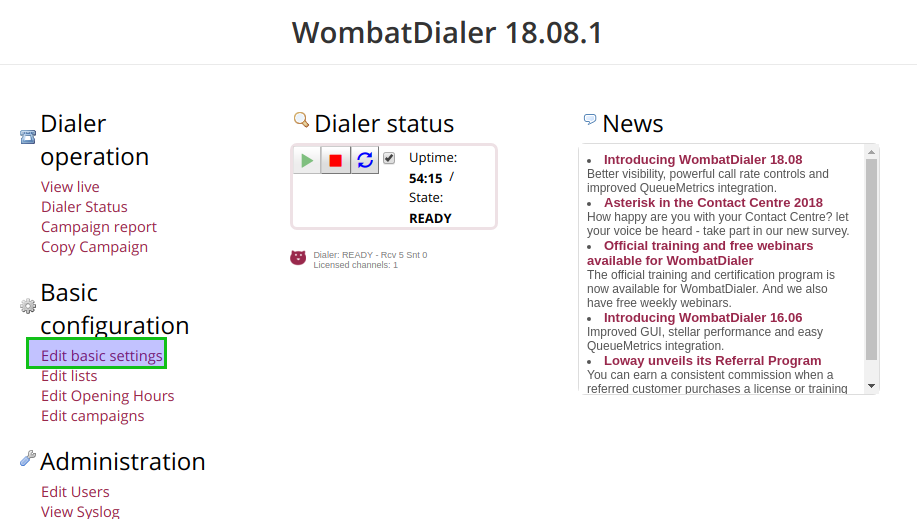
Figure 7: WD basic config
In this menu, first of all, a new conection instance must be generated inside the Asterisk Servers section as exposed in figure 8.
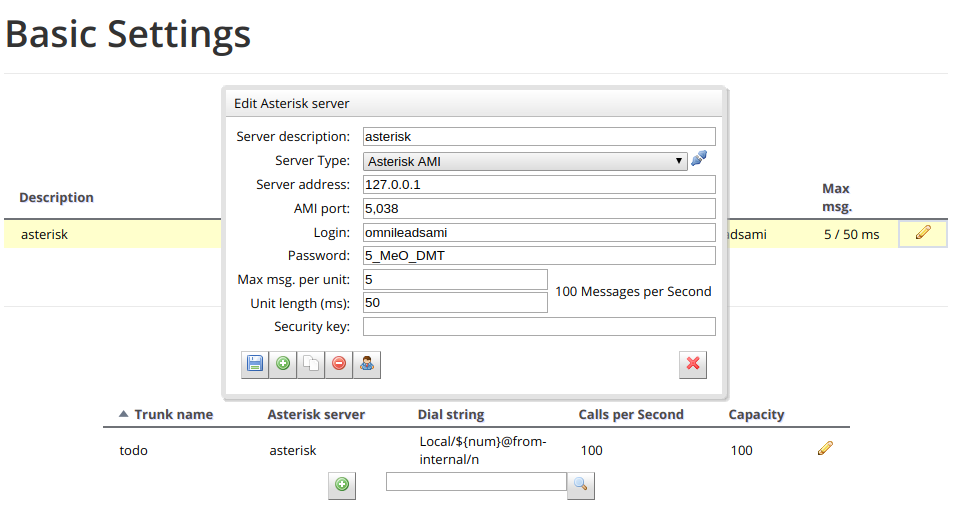
Figure 8: WD basic config - AMI Asterisk
In the next point, a Trunk is configured using an arbitrary “Trunk name”, but with the calling chain marked in figure 9. Local/${num}@from-oml/n
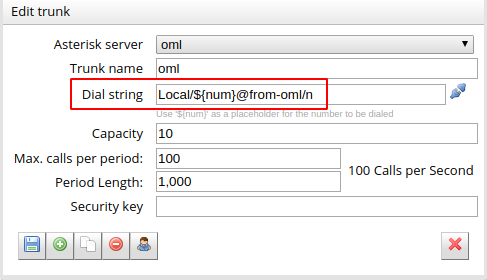
Figure 9: WD basic config - Asterisk Trunk
At last, remember to “play” the dialer service, as indicated in figure 10.
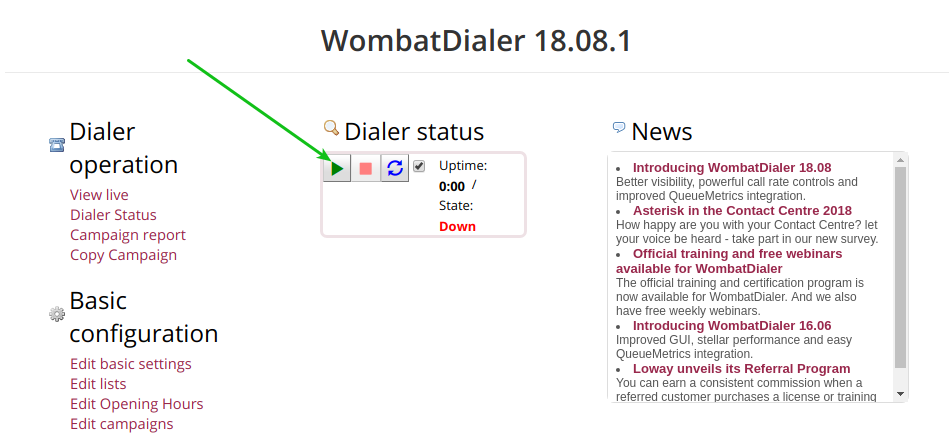
Figure 10: WD activate
Finally the platform is enabled to manage predictive calls. The default installation has a Wombat Dialer demo license for a channel.
Change SSL certificates
Si desea cambiar los certificados SSL con los que instaló la plataforma necesita tener el par llave/certificado en formato .pem. Renombre los archivos, tienen que llamarse *cert.pem y key.pem. Luego Ubique estos archivos en las siguientes carpetas:
/opt/omnileads/nginx_certs/
/opt/omnileads/kamailio/etc/certs
After that, restart the following services:
service nginx restart
service kamailio restart
Backup & Restore
OMniLeads has a script to perform the Backup/restore tasks.
Important
In case of perform the restore in a new machine, that machine must:
- Has OMniLeads installed in the same version that the productive machine
- Has the same IP and the same hostname of the productive machine
To perform a Backup:
We must access the host where OMniLeads is running through ssh. Once inside the host we execute the following commands.
su omnileads -
cd /opt/omnileads/bin
./backup-restore.sh -b
The execution of the script throws an output similar to the one on figure 11.
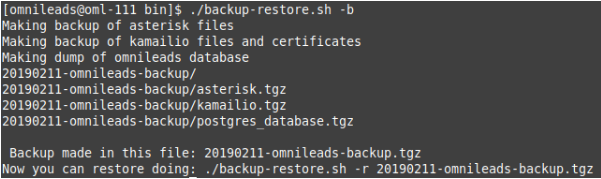
Figure 11: backup
As we can see, it indicates us how to perform the restore of that Backup.
Inside the path /opt/omnileads/backup, the “.tgz” files that contain the executed backups are generated.
If the restore is performed in a new host, then the file generated in the Backup within the path /opt/omnileads/backup must be left available.
To perform a restore, we must execute:
 su omnileads
 cd /opt/omnileads/bin/
./backup-restore.sh -r nombre_del_archivo_de_backup
For example:
 su omnileads
 cd /opt/omnileads/bin/
./backup-restore.sh -r 20190211_database.tgz
It is no needed to add the full location path of the backup.
A succesful restore throws an output similar to figure 12.

Figure 12: restore
Once the restore is finished, execute the following command to regenerate the configuration files and AstDB values of the restored instance:
/opt/omnileads/bin/manage.sh regenerar_asterisk
Upgrades
OMniLeads create continuously releases, so it’s necessary that you upgrade de software periodically.
Important
Upgrade under release-1.3.1 to release-1.3.1 (including it)
- Is ESSENTIAL to know the passwords for postgresql, mysql and django admin that were set during installation. You can see these passwords in my_inventory file and you will have to type them again in inventory file. If the same passwords are not used, the upgrade will set up the passwords you typed in inventory file
- If you don’t use the same MySQL password you set during install, the upgrade will fail
Upgrade after release-1.3.1
- If you don’t want to change variable values, just define the installation type.
- If you want to change some variable, ingress it in inventory file and the upgrade process will change it for you.
Below are the steps to follow in order to perform a new platform update. This task is also performed with the script “deploy.sh”.
Self-Hosted Upgrade
Para proceder en este escenario:
- Access as root user in the machine with OMniLeads installed
- Access the host omnileads as root Position on the directory where the script “deploy.sh” resides
cd ominicontacto/deploy/ansible
- Una vez posicionado sobre dicho directorio, procedemos a traer todos los cambios que se hayan realizado sobre el repositorio.
git fetch
Para luego seleccionar el release al cual se desea saltar:
git checkout release-V.V.V
Recordar que la tecla Tab al presionar más de una vez, autocompleta el comando desplegando todos los releases. Una vez seleccionado el release:
- Uncomment the line for self-hosted installation in the inventory file
##########################################################################################
# If you are installing a prodenv (PE) AIO y bare-metal, change the IP and hostname here #
##########################################################################################
[prodenv-aio]
localhost ansible_connection=local ansible_user=root #(this line is for self-hosted installation)
#10.10.10.100 ansible_ssh_port=22 ansible_user=root #(this line is for node-host installation)
- Then the script is executed with the -u (update) parameter. This execution will take some minutes and implies applying all the updates downloaded with the “git pull origin master” on our OMniLeads instance.
./deploy.sh -u --iface=$NETWORK_INTERFACE
- If everything flows correctly, at the end of the task execution we will see a screen as shown in figure 13.
Figure 13: updates OK
Actualizaciones en utilizando método Deloyer-Nodes
- The cloned repository should be accessed on our Workstation machine, to run the update on the Linux OMniLeads host.
cd PATH_repo_OML
cd ominicontacto/deploy/ansible
git fetch
git checkout release-V.V.V
Recordar que la tecla Tab al presionar más de una vez, autocompleta el comando desplegando todos los releases. Una vez seleccionado el release:
- Uncomment the line for self-hosted installation in the inventory file
##########################################################################################
# If you are installing a prodenv (PE) AIO y bare-metal, change the IP and hostname here #
##########################################################################################
[prodenv-aio]
#localhost ansible_connection=local ansible_user=root #(this line is for self-hosted installation)
10.10.10.100 ansible_ssh_port=22 ansible_user=root #(this line is for node-host installation)
- Then the script is executed with the -u (update) parameter. This execution will take some minutes and implies applying all the updates downloaded with the “git pull origin master” on our OMniLeads instance.
sudo ./deploy.sh -u
- Finally, the platform is updated to the last stable version “master”
Figure 14: updates from ansible remote OK
Note
AIO installations will not be supoorted in future for Debian and Ubuntu so, is recommended to use CentOS.
Docker containers Upgrade
Once installed OMniLeads dockerized is not going to be always necessary to use Ansible to make an upgrade of system, except in this cases:
- Upgrade of some component installed in Docker Host (rtpengine or postgresql).
- Modification of some parameter in docker-compose file.
- Addition of a new envar.
- In case that is necessary: follow the steps for OMniLeads Installation using Docker except the step of set up Passwords and parameters, unless you want to modify any variable. In the variable oml_releases, set up the release you want to upgrade.
- In case there is NO necessity: do the following steps:
- Go to /home/omnileads/prodenv/ folder
- There modify the RELEASE variable in .env file.
- Logout of actual session and login again.
After that make service omnileads-prodenv restart.
systemctl restart omnileads-prodenv
In restarting process, when the docker-compose is executed check the tag version, this will begin the download of new images for that release.
Note
The new releases use to bring new JavaScript code. The browser mantains the old code in the cache so it is recommended to install an addon in the browser to clear the cache. Clear cache to Google Chrome, for example
Changes of network parameters (Hostname and/or IP Address) and changes of passwords of services
AIO Environment
- To do these tasks, you must execute again the deploy.sh script
- If you want to change IP/hostname you must inside the server with root user, change the IP/hostname and be sure the system got the changes. A reboot of the system is recommended.
- If you want to change passwords edit the password you wish, see Passwords and parameters to check the variables related to passwords.
You must execute the deploy.sh script, this way:
./deploy.sh -u
Important
You must be sure you run the deploy script in the same release installed in the system, otherwises an upgrade of software will be done.
Docker Environment
The only difference with the AIO environment is that you must run deploy.sh script in this way:
./deploy.sh --docker-deploy
Users unblock
OMniLeads count with a block users system, when someone enter the wrong password three times. This is the security measure implemented to avoid brute force attacks in the platform’s Login console. The administrator user has the possibility of unblocking any user who has been blocked by entering the wrong password unintentionally.
To unblock it you enter the following URL: https://omnileads-hostname/admin, this URL displays the Django Administrator Console.
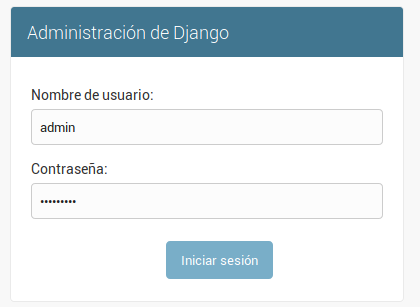
Figure 15: Django admin console
There, enter the admin user credentials. Then click on the button Defend

Figure 16: Defender in django admin
This opens the Django Defender administrator (https://github.com/kencochrane/django-defend) which is the Django plugin used to manage this. Click on Blocked Users
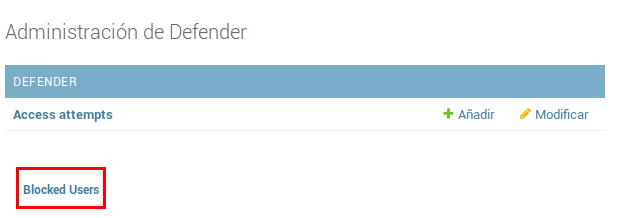
Figure 17: Blocked users view
You will see the blocked user. Just click on Unblock to unblock it.

Figure 18: Unblock user view
Now the user can login without problem.
OMniLeads unistall
If by any reason you want to unistall OMniLeads from your machine or VM, there is a script for that. It is already incorportaed in the install process, just execute it:
oml-uninstall
This script:
- Unistall the essential services of omnileads: asterisk, kamailio, rtpengine, mariadb, postgreSQL, wombat dialer, redis, nginx and omniapp.
- Delete the file /opt/omnileads (including recordings)
- Remove the databases
Note
The script does not unistall the dependency packages used to install the services.
Important
Be careful when executing it, once executed there is no way to recover the system.
Creando imágenes Docker de OMniLeads
OMniLeads cuenta con una imagen para cada servicio que compone el software, dichas imágenes oficiales están disponibles en nuestro Docker-Hub. Usted podrá crear sus propias imágenes basándose en los Dockerfiles que tenemos predefinidos para cada servicio, debe tener en cuenta lo siguiente:
- Se usa Ansible como herramienta para buildear muchas imagenes al tiempo, por lo que los Dockerfiles son templates de Ansible, ubicados en el deploy/ansible/roles/docker/files/Dockerfiles. Esto quiere decir que si quiere hacer algún cambio en los Dockerfiles debe tener conocimiento en Ansible.
The Docker DevEnv and ProdEnv
OMniLeads provides a development environment (DevEnv) for Django developers who want to get involved in the project, we take care of the maintenance of these images and they are responsible for the 9 services that make up the system. This environment is ideal for developing code changes and having the change in real time, without the need to restart containers. In turn, ProdEnv is the ideal environment for productive environments, using images from 5 services (all except mysql, postgresql and rtpengine).
Images build
To builde images follow the next steps:
- Specify in the ansible inventory file which environment you want. Uncomment the line that says #localhost depending on the environment.
# If you are installing a devenv (PE) uncomment
[prodenv-container]
#localhost ansible_connection=local
# If you are installing a devenv (DE) uncomment
[devenv-container]
#localhost ansible_connection=local
- In the same file observe the section [docker: vars], in it you will see some variables without value:
[docker:vars]
registry_username=
#registry_email=
#registry_password=
oml_release=
Enter there the username, email and password of the Registry where you want to upload your images. The oml_release variable is used only when you want to compile images for ProdEnv. This variable will define the Tag that the images will have
- Lastly, run the deploy.sh script as follows:
./deploy.sh --docker-build
Note
During the execution the images are built and pushed at once, so if you experience any error at the time of the build due to internet connection problems, it is recommended to run the script again.
- We have the option of creating the entire build environment (with all the files necessary for that build rendered) but without the images being built / pushed. In this way we give the option for the developer to study in depth the Dockerfiles of each service. Run the deploy.sh script as follows:
./deploy.sh --docker-no-build
You will find all this content in