Inventory file
In the different sections of the inventory file, parameters related to the App deployment are described:
- Deployment type to be executed
- OMniLeads architecture that will be deployed
- Users and passwords of the different components
- Session times
- Recordings format
- Timezone
- NAT support
OMniLeads architecture
We begin by explaining the first section of the file, where the type of Architecture to deploy and under which installation method is specified. Remember that the possible combinations are:
- 1-a) OMniLeads Traditional Architecture (AIO) through a Self-Hosted deployment
- 1-b) OMniLeads Traditional Architecture (AIO) through a Deployer-nodes deployment
- 2-a) OMniLeads on Docker Containers through a Self-Hosted Deployment
- 2-b) OMniLeads on Docker Containers through a Deployer-nodes deployment
- 3) OMniLeads devenv (development environment)

OMniLeads Traditional Architecture (AIO)
To deploy this architecture [OMniLeads Traditional Architecture Deployment (AIO)], you should work with the [prodenv-aio] section
##########################################################################################
# If you are installing a prodenv (PE) AIO y bare-metal, change the IP and hostname here #
##########################################################################################
[prodenv-aio]
#localhost ansible_connection=local ansible_user=root #(this line is for self-hosted installation)
#X.X.X.X ansible_ssh_port=22 ansible_user=root #(this line is for node-host installation)
- Self-Hosted Deployment: in the case of applying (1-a), the first line should be uncommented, leaving:
[prodenv-aio]
localhost ansible_connection=local ansible_user=root #(this line is for self-hosted installation)
#X.X.X.X ansible_ssh_port=22 ansible_user=root #(this line is for node-host installation)
- Deployer-Nodes Deployment: in the case of applying (1-b), the second line should be uncommented and replace the string X.X.X.X with the IP of the node to be displayed:
[prodenv-aio]
#localhost ansible_connection=local ansible_user=root #(this line is for self-hosted installation)
192.168.95.100 ansible_ssh_port=22 ansible_user=root #(this line is for node-host installation)
OMniLeads on Docker Containers
To deploy this architecture [about_install_docker], you should work with the [prodenv-container] section
# If you are installing a devenv (PE) uncomment
[prodenv-container]
#localhost ansible_connection=local ansible_user=root #(this line is for self-hosted installation)
#X.X.X.X ansible_ssh_port=22 ansible_user=root #(this line is for node-host installation, replace X.X.X.X with the IP of Docker Host)
- Self-hosted Deployment: in the case of applying (2-a), the first line should be uncommented, leaving:
[prodenv-container]
localhost ansible_connection=local ansible_user=root #(this line is for self-hosted installation)
#X.X.X.X ansible_ssh_port=22 ansible_user=root #(this line is for node-host installation, replace X.X.X.X with the IP of Docker Host)
- Deployer-Nodes Deployment: in the case of applying (2-b), the second line should be uncommented and replace the string X.X.X.X with the IP of the node to be displayed:
[prodenv-container]
#localhost ansible_connection=local ansible_user=root #(this line is for self-hosted installation)
192.168.95.100 ansible_ssh_port=22 ansible_user=root #(this line is for node-host installation, replace X.X.X.X with the IP of Docker Host)
Important
Be very attentive when uncommenting the appropriate lines according to the architecture to be deployed and its installation method. For example; Do not uncomment those of container environment if you want to install AIO.
Passwords and parameters
Once the part inherent to the architecture and type of installation has been configured, we proceed with everything related to users and passwords of some components as well as certain parameters of the App:
[everyone:vars]

###############
# Credentials #
###############

#####################################################################
#                           Database                                #
#                    SET POSTGRESQL PASSWORD                        #
#####################################################################
postgres_database=omnileads
#postgres_user=omnileads
#postgres_password=my_very_strong_pass
#####################################################################
#                           Web Admin                               #
#                     SET WEB ADMIN PASSWORD                        #
#####################################################################
#admin_pass=my_very_strong_pass
#######################################
# AMI for wombat dialer and OMniLeads #
#######################################
#ami_user=omnileadsami
#ami_password=5_MeO_DMT
#############################
# Wombat dialer credentials #
#############################
#dialer_user=demoadmin
#dialer_password=demo
#################################################################################################
# Set the timezone where the nodes are. UNCOMMENT and set this if you are doing a fresh install #
#################################################################################################
#TZ=America/Argentina/Cordoba
####################################################################################################
# Session Cookie Age (SCA) is the time in seconds that will last the https session when inactivity #
# is detected in the session (by default is 1 hour)                                                #
####################################################################################################
SCA=3600
###############################################################################################
# Ephemeral Credentials TTL (ECTTL) is the time in seconds that will last the SIP credentials #
# used to authenticate a SIP user in the telephony system (by default 8 hours)                #
###############################################################################################
ECCTL=28800
#################################################################################################
# MONITORFORMAT refers to the format that your recordings will be converted.                    #
# Mp3 is the preferred format because the small size of file.                                   #
# If you want your recordings in format "wav" (asterisk default recording format), change this  #
# variable to wav.                                                                              #
# The conversion of recordings is scheduled to be done at 01:00 am everyday.                    #
# You can edit this # changing crontab of omnileads user                                        #
#################################################################################################
MONITORFORMAT=mp3
#################################################################################################
# Login failure limit (LFM) is the attempts a user has to enter an incorrect password in login  #
# Decrease it if paranoic reasons                                                               #
#################################################################################################
LOGIN_FAILURE_LIMIT=10
####################################
# Language of schedule disposition #
####################################
schedule=Agenda
As you can see, the file is fully documented in terms of each variable or parameter.
Important
When deploying, the mentioned parameters must be uncommented. If you do not uncomment them the installation will fail.
Parameters to deploy behind NAT
The settings external_hostname, external_port, must be configured if you want to install OMniLeads in a cloud server behind NAT, where the agents will connect to an URL composed by https://external_hostname:external_port, without having a LAN direct connection or through VPN to the OMniLeads server.
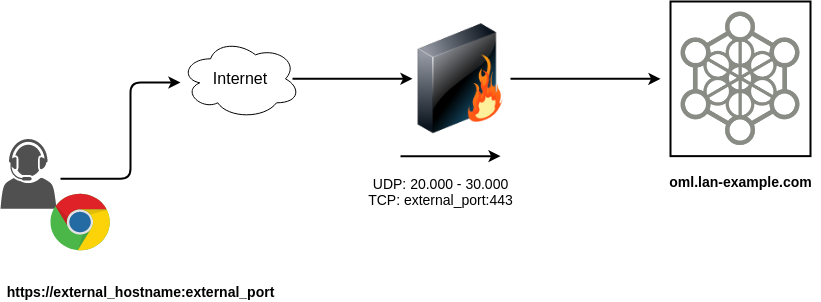
As it is attempted to express in the image, it is assumed that remote users will access the App using a URL (domain and port) that resolves to the public IP of the WAN router / firewall interface.
Then the firewall must forward the voice and data traffic to the UDP: 20000-30000 and TCP: 443 ports of the host where the App resides.
#######################################################################################
#                                OMniLeads cloud:                                   #
# If you are wishing to install OML in a cloud provider you must set these variables: #
#  - external_port: the outside port where OML web server will listen requests        #
#  - external_hostname: the dns external users will connect to                        #
#  - public_ip: where OML is installed                                                #
#######################################################################################
#external_port=
#external_hostname=
Important
Two inbound and one outbound firewall rules must be established:
- Forward incoming traffic from ports 20,000 to 30,000 UDP to ports 20,000 to 30,000 on the OMniLeads host
- Forward traffic from the chosen external port to port 443 of the OMniLeads host
- Permit outbound traffic from OMniLeads to internet, port range: 10000-30000 UDP
Docker variables
This section allows you to customize two parameters when deploying OMniLeads as docker containers.
[docker:vars]
registry_username=freetechsolutions
#registry_email=
#registry_password=
subnet=192.168.15.0/24
- if you are going to deploy the official OMniLeads images, leave this variable as is. If you have your own images, the name of the relevant docker-registry will be indicated here.
- subnet: it refers to internal docker LAN network
The variables registry_email and registry_password are neccesary just when you want to make a build of your own images.